
In the first two parts of our series, we explored the materials and staff roles that make APLICOR 3D such a groundbreaking innovation in wound care. In our final post in this series, we’ll walk through the entire procedural workflow — from patient preparation to final scaffold placement — providing clinicians and care teams with a clear understanding of what to expect.
APLICOR 3D is designed to be efficient, intuitive, and personalized; however, its success ultimately depends on precise execution. The following step-by-step guide outlines the core process using the Tides Medical APLICOR 3D system.
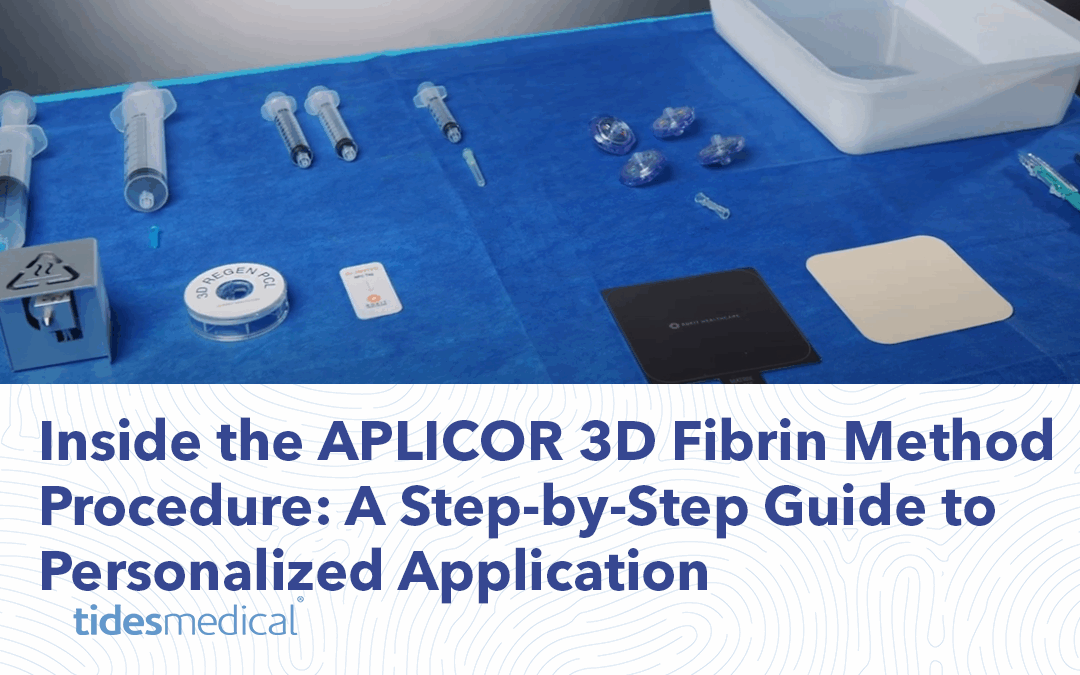
Step 1: Prepare the Sterile Field and Inject Tumescent
- Prepare the sterile workspace with all required instruments and supplies.
- Use a 30–50ml Luer Lock syringe filled with normal saline (leave ~10ml headspace).
- Inject the tumescent solution into the designated area for fat harvesting.
- Allow at least 10 minutes for complete infiltration before proceeding with fat harvest.
Step 2: Debride the Wound
- Remove necrotic tissue and ensure the wound bed is adequately prepared for grafting.
- Wound debridement must be thorough to ensure graft adherence.
Step 3: Capture Wound Measurements with the AiD Regen Tablet
- Power on the AiD Regen tablet and log into the application.
- Snap a photo of the wound using the AI-driven app and mirror tool.
- The system assesses the wound size and calculates material requirements (fat volume, PCL length, fibrin/thrombin needs).
- Send the digital model to the APLICOR 3D printer wirelessly.
Step 4: Print the Scaffold
- Load the NFC tag, sensor tray, matrix plate with bed film, and Dispenser 1 into the APLICOR 3D printer.
- Insert the correct size of PCL (polycaprolactone) based on wound size (Small, Medium, Large).
- Initiate printing via the printer screen using the “Scaffold” function.
Step 5: Harvest Fat
- Harvest adipose tissue from the pre-infiltrated area using surgical tools.
- The amount harvested is based on the AI guidance from the AiD Regen tablet.
Step 6: Micronize the Fat
- Use a color-coded micronizer sequence (Red → Yellow → Green → Blue) to process fat into a printable form.
- Pass fat between paired syringes 11 times per micronizer to reach optimal consistency.
Step 7: Separate Fluids and Purify Tissue
- Using a luer-to-luer connector, mix micronized fat with normal saline in a larger syringe.
- Invert and rest in a standing rack to separate blood and fluids from purified adipose tissue.
- Discard the fluid, keeping the refined fat layer for Bio Ink preparation.
Step 8: Prepare the Bio Inks
- Bio Ink 1: Mix ECM and fibrinogen using a luer connector, then load into a 5ml syringe with a 21G 1″ needle.
- Bio Ink 2: Load thrombin into a separate 5ml syringe (also with a 21G needle).
- Be careful to keep fibrin and thrombin separate until the final stage of the process.
Step 9: Print the Bio Ink
- Load Bio Ink 1 into the APLICOR 3D printer and initiate printing.
- Once completed, remove the syringe and repeat the process for Bio Ink 2.
- If additional volume is needed, repeat the steps, but do not press “OK” on the printer screen until the process is complete.
Step 10: Apply the Graft
- After about 25 minutes, once the graft reaches the desired gel-like consistency:
- Use Bio Ink 2 to detach the printed graft from the bed film gently.
- With sterile forceps, place the graft on the prepared wound bed.
- Apply the first and second dressings to secure the graft in place.
Best Practices and Reminders
- Always double-check syringe and needle specifications (e.g., exact 21G-1″ needles).
- Ensure the iPad and printer are on the same Wi-Fi network with DHCP reservations enabled.
- If you are unsure about the sterilization status, activate the printer’s UV sterilization lamp for 30 minutes before starting.
- Label all syringes clearly during the process to prevent cross-contamination.
The Future of Personalized Wound Care
APLICOR 3D is more than a technical breakthrough — it’s a workflow transformation. By combining AI-driven modeling, 3D bioprinting, and patient-derived tissue, clinicians can deliver precision skin grafts in real time, customized for each patient.
This concludes our 3-part blog series on APLICOR 3D. If you missed the earlier installments, go back to explore:
Do you have questions, or would you like to bring APLICOR 3D to your clinical setting? Contact Tides Medical for training, support, or ordering information today.
 Marc Stemler,
  Mora Melican, Ph.D., VP of Operations, Research & Development
 LESA CATALON,
 DAVID CASTILLE,


 JOSH WILLETT,
 JEFF MONTGOMERY,
 MIKE RIDDLE,
 BENJAMIN KIMBALL,
 DOUG PAYNE,


")
")